A
Lesson in Knitting
(These lessons
are from,
Handbook of Wool Knitting and Crochet, 1918, and are a good resource
for the patterns posted here from the book.)
 Figure 1. Casting on with Two Needles
The first thing to be done in knitting is to cast on or, as it is
sometimes called, to "set up the foundation." (Figure
1). There are several methods for this, the following being that
preferred and generally used by the writer: Leave a spare end of thread,
sufficient for the number of stitches you wish to cast on, lying toward
the left, the spool or ball from which the working-thread is drawn being
at the right. Lay the thread between the little finger and the third of
the left hand; bring the working-thread across the palm of the hand,
around the thumb and back between the forefinger and second finger; bend
the forefinger over this thread (which passes between it and the second
finger), pass it under the thread which crosses the palm of the hand,
and then draw the forefinger back, or straighten it, which will give you
a loop with crossed threads. Put the needle under the lower part of this
loop, which draws from the ball, bring the working-thread (or
ball-thread) around the point of needle from right to left, as in plain
knitting, draw it back through the loop, slip off the latter, and draw
up the left thread. Then proceed to make the crossed loop and knit it
off in the same way for the next and following stitches. The whole
operation is very simple, although the instructions seem long because
explicit. Take your needle and yarn or thread and follow them through
carefully, and you will very soon master the "crossed casting on."
Another method, preferred by many and practically the same in effect,
except that the edge is not quite so firm, is as follows: Loop the
thread around the left forefinger, holding the spare end between thumb
and second finger, pass the needle upward through the loop, pass the
thread around the point, draw back through the loop, slip off the latter
and pull up the spare thread. By passing the needle under the loop, or
lower thread, instead of through it, bringing it back through, and then
knitting off, you will really get the crossed loop, and many find this
method easier than the first. The thread used in casting on may be
doubled, particularly for beginning a stocking, mitten, or any article
where much wear comes.
Casting on may also be done with two needles, and many like this
method when there are many stitches. Twist a loop around the needle held
in the left hand, bring the end of thread, or spare thread, to the
front, crossing the working-thread to hold it in place—or, if preferred,
simply tie a slip-knot and put the loop on the left needle; insert the
right needle through this loop from left to right, put thread around
point of right needle and draw through the loop, bringing the right
needle again in front of left. Thus far, the process is quite like that
of plain knitting. Keeping the right needle still in the new stitch or
loop, transfer the stitch to the left needle by bringing the latter in
front and putting the point through the loop from front to back, leaving
the right needle in place for the next stitch; the loops are not slipped
off, as in knitting plain, but transferred, so that all are kept on the
needle. A little practise will enable one to cast on thus very rapidly
and evenly.
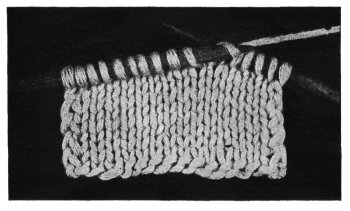 Figure 2. Knitting Plain
The plain knitting (Figure 2), is done as
follows: Having cast on the requisite number of stitches, insert the
right needle through the front of left needle from left to right, the
right needle passing behind the left; carry the thread around point of
right needle and bring it down between the two needles, then draw the
point of right needle back and through the stitch, forming the new
stitch on right needle and letting the other slip off the left, pushing
down the point of left needle to facilitate this process; repeat until
all the stitches are knitted off and the row is complete. Where there
are edges to be joined, as in knitting back and fronts of a sweater, it
is a good plan to slip the first stitch of each row.
Right here a suggestion about the method of holding the thread may be
of value: By the first method the thread is carried over the little
finger of right hand, under second and third fingers and over the tip of
the forefinger, which should be held close to the work; it is this
finger which passes the thread over point of right needle for the new
stitch. By another method the thread is carried over the left
forefinger, under second and third and over the little finger, exactly
as it is held for crocheting: insert the right needle through 1st stitch
on left needle in usual way, push it over the thread on left forefinger,
and draw this back through the stitch with the point of right needle.
Only the needle is held in the right hand, and many workers claim that
the work is much more rapidly done.
 Figure 3. Purling
The purl- or seam-stitch (Figure 3) is the
exact reverse of plain knitting, both as to method of work and
appearance, being in reality the wrong side of plain knitting. In the
latter the thread is kept at the back of the work; for purling, bring it
to the front between the two needles. Put the point of right needle
through the front of 1st stitch on left needle from right to left, the
right needle being thus brought in front of the left; pass the thread
around the front of right needle from right to left and back between
needles, then push down the point and draw the loop backward through the
stitch, instead of forward, as in plain knitting, the right needle being
thus brought behind the left. Slip off the old stitch as usual, and take
care to return the thread to its place at the back before beginning to
knit plain again.
 Figure 4. Garter-Stitch, or Ridge-Stitch
Garter-stitch, so called (Figure 4) is
simply plain knitting back and forth, which gives the effect of ridges,
one row knit, the next purled. This is a stitch much used for sweaters,
and other knitted garments. If one wishes to have the right side appear
as in plain knitting, the 1st row must be knitted plain, the next
purled. Since one is the reverse of the other, the right side will be
plain knitting, the wrong side purled.
 Figure 5. The Double Rib
The rib-stitch is alternately plain and purled. To knit the single
rib, * knit 1, purl 1; repeat. For double rib, (Figure
5,) * knit 2, purl 2; repeat; and for triple-rib, * knit 3, purl 3;
repeat. Any width of rib may be made that is liked, always taking
care—unless knitting in rounds, as a wristlet, mitten or stocking—to
knit the stitches purled on the preceding row, and purl the knitted
ones. There are a large variety of fancy patterns made by combining
plain knitting and purling, such as the basket-stitch and others, of
even or broken "check."
There are many variations of the simplest stitches; for example, the
common garter-stitch gives a particularly good effect if knitted from
the back. Put the needle in from right to left, through the back part of
the stitch to be knitted; leave the thread behind the needle, then pass
it from right to left over the needle and draw it through the stitch,
allowing the latter to slip off as in plain knitting. In this stitch the
two threads of the loop are crossed, instead of lying side by side as in
plain knitting.
 Figure 6. Making "Overs"
"Overs" (Figure 6) are used in all lace
patterns, and many times in fancy designs for wool knitting. To make an
"over" bring the thread before the needle as if to purl, then knit the
next stitch plain as usual. This brings a loop over the needle, which in
the next row is to be knitted as any stitch, thus increasing the number
of stitches in the row. In case it is not desired to increase the
stitches, one must narrow, by knitting two stitches together, once for
every "over." If a larger hole is wanted, the thread is put twice over
the needle, and in the following one of these loops is knitted, the
other purled.
To "purl-narrow," or purl two together, bring the thread to the front
as for purling, then to form the extra stitch, carry the thread back
over the needle and to the front again; then insert the right needle
through two stitches instead of one, and knit them as one stitch.
"Fagot" is an abbreviation frequently used for this.
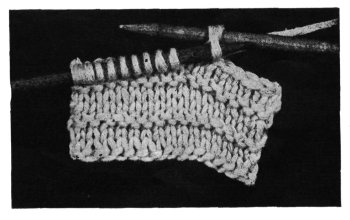 Figure 7. Binding Off
To slip and bind, slip 1st stitch from left needle to the right
needle, without knitting it; knit next stitch, then draw the stitch on
right needle over the knitted one, letting it fall between needles. To
slip, narrow and bind, slip first stitch, knit next two together, and
draw the slipped stitch over. To cast off or bind off, (Figure
7,) slip 1st stitch, knit next, draw slipped stitch over, knit next
stitch, draw the previous knitted stitch over, and continue, taking care
that the chain of stitches thus cast off be neither too tight nor too
loose, but just as elastic as the remainder of the work.
Please
do not post these instructions to another website. However, Please feel free
to post a link to this page:
http://www.knitheaven.com/vintagepatterns/hwkc_lesson_in_knitting.htm